
This is how we do it - Making cards with InDesign
- Pini Shekhter

- May 28, 2016
- 4 min read
This is the first of (I hope) many instructional blog entries about how to make board games, or more specifically, how to make their physical parts from game pieces to sales sheets.
A few programs I use regularly are the famous Adobe ones. I have some old versions I got for cheap, you might still be able to do that.
InDesign deals with any printed media and what are cards if not printed media? This is also not limited to cards of course. You can make tiles or anything you can wish using this instructional post.
The first time using InDesign can be a bit hard since it is kind of different from other Adobe programs and I'm not going to go over the small details that you can find in the 'help" section. I will try and show you how to make cards using the Data Merge option the best way I know how. There are 3 easy steps for making good looking and functional cards.
I use Game-Icons.net as the base for most of my icons. If you don't know that site and you design game, go there quickly. Come on, run along!
I will use a new coop game I'm working on named "Capo di Napoli". If you wish to, you can read about it in previous posts called "Let's cooperate".
The steps in short:
1. Make a card prototype
2. Build good sheets and images
3. Merge and export
Step 1 - Make the card prototype
After making a new file with the card size you wish to use, you will need to place and size everything you want the card to have in it. The best way to think about it, is making one card that has all the pieces any card can have. If you have a few types of cards, make one of these for every type separately.Make sure you fit the content of pictures to their frames. Make sure text boxes are large enough to fit the text you want to put in them. Make sure the text is aligned to the right side (or middle). For example, I want the card name and card text to be aligned to the middle but the numbers at the bottom should be aligned to the right. Also be aware of something called "vertical alignment" that helps you set text to the vertical center of boxes. I also love adding a layer underneath with some paper texture.
For now - everything you put in this card prototype is a placeholder.
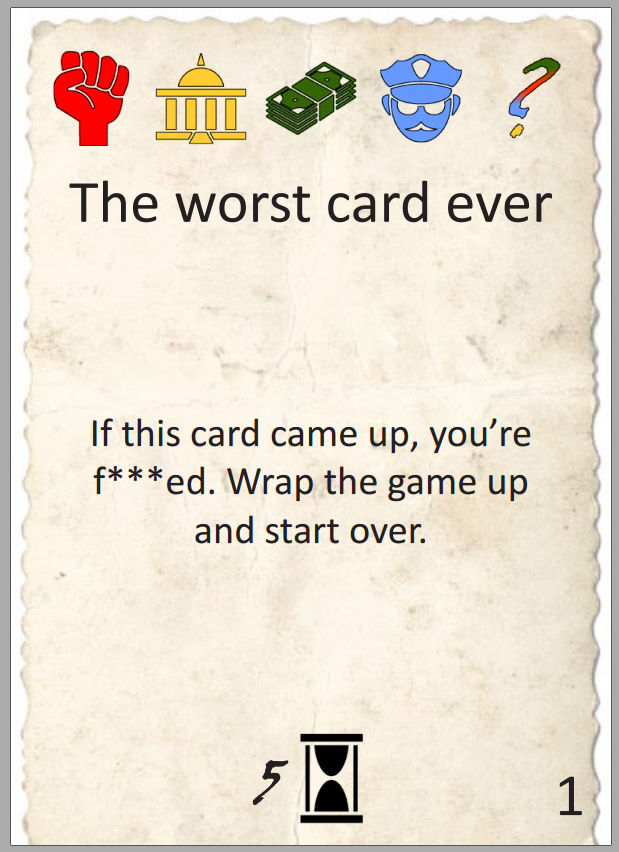
One of the card types in my game looks like this:

Step 2 - Build good sheets and images
A good sheet for cards includes clear titles for the columns. If a column includes text just give it a name like "Name" or "Deck number" (no need for " "), but if the column contains image file names the name should be proceeded by "@". For example, the card above needs 5 icons (titles "@i1-@i5"), it needs a name and text, it needs a number for the timer (title "T") at the bottom and a deck number (title "DNum"). The hourglass icon at the bottom will be on all cards, so I just place it on the card prototype and that's it. Your sheet can have as many lines as you wish, each will correspond to one card. Make sure that other than those columns the file is squeaky clean.
Take a look at the image below for an example of one card (I broke the line for the convenience of viewing the image):

As for the images, I use PNG. PNG lets you have a transparent background which is very important. You can also use PSD if you like, but the files are much heavier. For the sake of simplicity place all the image files with the InDesign file and make sure that their size ratio suits the images you place in the card prototype. Save your sheet as a CSV file and place it in the same folder.
Step 3 - Merge and export
Open Data Merge in InDesign (you can find it inside automation). In there go to "select data source" and choose your shiny new CSV file. Then you will see all your columns translated into InDesign (if you did everything right...). You can see anything that had a @ as a picture item and anything that didn't have a @ as a text item. Now you must assign these items to the card. For pictures, just click the image you placed as a placeholder in the prototype and then the item from the Data Merge that fits it. The image should disappear and be replaced by an empty box with the name of the Data Merge item. As for text, you will need to select the placeholder text and than click the text item in the Data Merge window. Text can be tricky because you need the text boxes to show all the name of the Data Merge item and since the name can be long you will need to extend the text boxes sideways to let all the text in. Remember I told you aligning is important? That's where it comes into play!
At the end of this process your file should look something like this:

Now you can either export using the Data Merge "export to PDF" or "create a merged document" to one file where every card is a separate page and then export using the regular export option. A more advanced option is copying what you created into an A4 (or whatever you print on) and then create a merged document with "multiple records layout".
If you did everything right, you will get a PDF looking like this:
Now you can go crazy. Download some images from the internet. Use whatever you wish in order to make your game look amazing. Don't mind copyrights because you are not creating a product, just a prototype. If you don't sell your prototype commercially you can use whatever you wish. I will end with an example of a card I made for an early prototype of my pirate game. Point the use of textures and the borrowed image.
Don't you want to play this pirate game already? :P


Comments